Working with Bleed
Figuring out if your artwork has enough bleed can be tricky – especially as different printers require different set ups. Some may require the bleed area to be outside of the canvas, whilst others, such as ourselves, require the bleed area to be within the canvas area.
So what is Bleed?
Bleed is ink that prints outside of the trim edge of the paper. This is to ensure that colour extends all the way to the edge once it has been trimmed. A minimum of 3mm bleed is needed for most print jobs because there is a degree of movement on any sort of press (Nothing is perfect, right?). Supplying artwork without sufficient bleed area can cause a white border around the edge of a print or important text to be cut off.

Making sure your cards have a bleed area
To ensure your card designs have adequate bleed area, the canvas must be set up to 15.3×15.6cm. This will create an extra 3mm on the top, bottom and right edges of the design. Once the cards are trimmed, they measure 15x15cm.
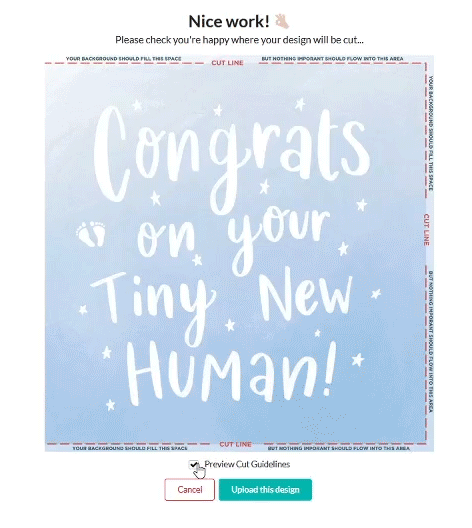
The below image illustrates the top, bottom and right 3mm border your artwork requires. Background colours or patterns should still fill this space, so that there aren’t any white lines after trimming. However, it is crucial that there is no text in this area.

In the artist Welcome Pack, you will be supplied with a template to ensure you are using the correct dimensions for your designs. Our web Uploader also has a handy Bleed Guideline you can toggle on or off to ensure none of the important bits will be cut off after trimming.
Remember: centered designs will be 3mm to the left because of the bleed on the right hand side.
And that’s it!
It’s very straightforward when you know what your printer requires. If you’re still struggling, feel free to shoot us an email at hello@wuzci.com
Happy designing!