Working in CMYK

Setting up artworks for print can be a pretty daunting task if it’s not something you’re used to. Ensuring your artwork is set to the correct colour profile is crucial if you want to match the print colours as closely as possible to what you see on screen. Of course there are still many variables to consider, even when working in CMYK – differences in screens, inks, paper stocks, texture and print presses. However by working with the correct colour profile, you eliminate any variables you are able to control and differences you see on the final print should be minor.

So what does CMYK mean?

CMYK refers to the inks used in printing; Cyan, Magenta, Yellow and Black. Any artwork that will be printed, needs to be supplied in the CMYK colour format to tell the printer how to create the correct colours. Most digital editing programs will have an option to alter your Colour Mode.

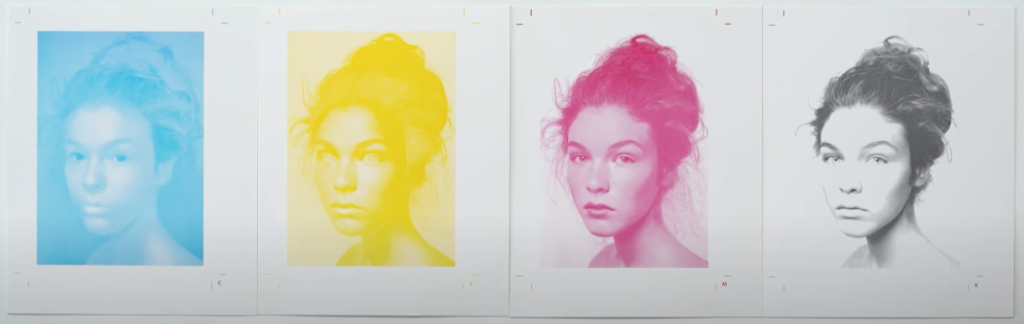
During printing, each of the four colours are layered to create the finished result.

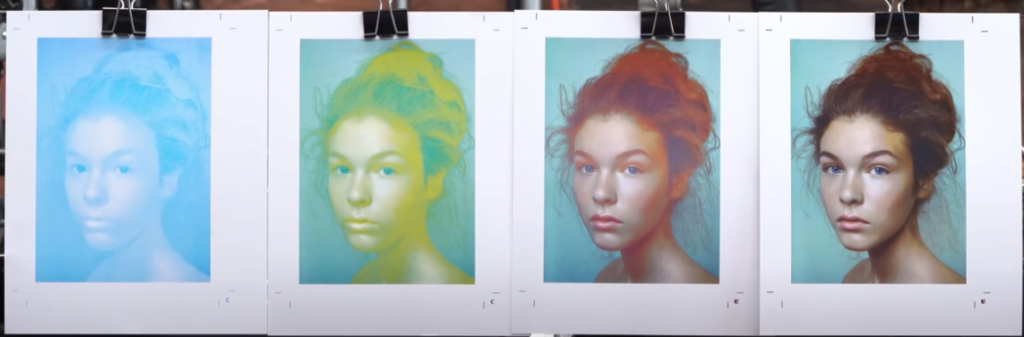
These four inks are the reason we cannot accept artworks in RGB colour format. RGB (Red, Green, Blue) is what each pixel on your screen is made up of to create the on-screen colour you see. The breadth of colours available for RGB format is much bigger and is only used for electronic prints (TV, monitors, cameras etc).

So remember:

• RGB for screen

• CMYK for print

How do I set my document up to be CMYK?

If you’ve already started your artwork and aren’t sure whether you have set the document up correctly, you can usually check and adjust this at any point.

In Adobe Photoshop, simply hitting the keys CTRL + Y (Windows) or CMD + Y (Mac) will toggle a CMYK preview. This does not change the colour mode of the document, but you will be able to check any differences in colours.

Another great way to double check your colours in Adobe Photoshop can be found in the Colour Picker window. If the colour selected is not within the CMYK colour range, a small ! in a triangle will appear next to it. By clicking directly onto the symbol, the program will automatically select a colour in the CMYK range.

It’s as simple as that!

When designing your cards, to make sure the colours you see on screen match the final printed product, always make sure to work in the CMYK colour mode. But don’t worry – if you use our pre-made templates, you will see that these are already set up this way.

If you have any questions about artwork setup, feel free to drop us an email at hello@wuzci.com

Happy designing!

Working with Bleed

Figuring out if your artwork has enough bleed can be tricky – especially as different printers require different set ups. Some may require the bleed area to be outside of the canvas, whilst others, such as ourselves, require the bleed area to be within the canvas area.

So what is Bleed?

Bleed is ink that prints outside of the trim edge of the paper. This is to ensure that colour extends all the way to the edge once it has been trimmed. A minimum of 3mm bleed is needed for most print jobs because there is a degree of movement on any sort of press (Nothing is perfect, right?). Supplying artwork without sufficient bleed area can cause a white border around the edge of a print or important text to be cut off.

Making sure your cards have a bleed area

To ensure your card designs have adequate bleed area, the canvas must be set up to 15.3×15.6cm. This will create an extra 3mm on the top, bottom and right edges of the design. Once the cards are trimmed, they measure 15x15cm.

The below image illustrates the top, bottom and right 3mm border your artwork requires. Background colours or patterns should still fill this space, so that there aren’t any white lines after trimming. However, it is crucial that there is no text in this area.

In the artist Welcome Pack, you will be supplied with a template to ensure you are using the correct dimensions for your designs. Our web Uploader also has a handy Bleed Guideline you can toggle on or off to ensure none of the important bits will be cut off after trimming.

Remember: centered designs will be 3mm to the left because of the bleed on the right hand side.

And that’s it!

It’s very straightforward when you know what your printer requires. If you’re still struggling, feel free to shoot us an email at hello@wuzci.com

Happy designing!

Creating the Perfect Card

Here at Wuzci, we want to help your design skills thrive and offer every opportunity to improve (and thus, increase your sales!). Sometimes this can mean a simple font tweak or adjusting your design layout so that it reads more easily.

With our brand new Artist Uploader, more of the power is in your hands. You are in charge of ensuring your designs look top notch on the shop, from the image to the name and the description. Ensuring your product listings look clean and professional is the surest way to capture your audience and pull in more of your commission.

We have pulled together some of our top tips & tricks to help your designs shine on our shop.

1. Starting the Design

Having a very clear image of the audience for a card is of the most important starting point. As you’re putting pencil to paper, ask yourself: Who is going to buy this card? Who are they buying it for? What kind of voice am I trying to convey with this design? Do I want to make people laugh, or am I helping them convey something much deeper?

Once you have a clear vision of who and why this card would be sent, using contemporary inspiration for fonts and colours can help bring your idea to life. Why not check out our inspiration boards on Pinterest or one of our Inspiration Emails?

TIP: Using a variety of fonts within your collection of designs could help you to cater to a wider audience and make sure your cards don’t all have the same ‘feel’
TIP: Instead of leaving the text central in this design, pushing it to the left gives it a more interesting composition and stops the darker blue from dominating too much of the frame.

2. Uploading your designs

Once your design is finished up, it’s time to upload it onto the shop!
All designs must measure 15.3cm x 15.6cm to allow for a 3mm bleed along the top, bottom and right edges. Check out our guide on Bleed.

After dropping your design into our Uploader tool, you will be able to preview it with or without the bleed guidelines. Designs need to be centralised within the 15cm square, not the entire canvas as this will result in designs either being cut off or looking off-center once printed.

TIP: If your design contains a border like this one from Quince Prints, ensure it is correctly centralised after the edges have been trimmed. Designs that do not meet this criteria will be rejected.

3. Naming and Descriptions

Creating your design name and description is the last, but one of the most important steps in submitting a design.


• Design titles need to be short and relevant. Using the phrase on the card or something related to the category is a good place to start. You do not need to write “Card” in the title.

• The description is what customers will see on the product page. This can describe the card in more detail than the title, but could also be a good place to write in who the card could be for or the perfect time to give it to someone.

• Adding relevant tags is the best way for customers to reach your design. Think about the search terms someone might use to get to your card. Put yourself in the customer’s shoes, keep it simple and remember to use words that describe your card well, e.g. “Dachshund card”, “Funny card”, or “Girly”.

• Remember that search engines also pull information from the product pages. The more accurately you describe your card, the higher chance it has of appearing in a potential customer’s search result.

E.g. When searching for “Dog Card”, Google pulls these results and puts those key words in bold.
TIP: It can be tempting to get lazy at this point, but customers won’t be able to find your cards if they aren’t tagged properly! Everything written on the product page helps to boost the designs SEO!

4. Waiting for Approval

Once your design is submitted, you will see the below message.
Designs are usually reviewed within 24 hours of submission and you will receive an email notification once it’s gone live. Please be patient whilst your design is under consideration.

If there are any problems with your submission, we will contact you outlining what we need you to amend and requesting that you re-submit once those changes have been made.

If you’re unsure about any part of this process, simply drop us an email at hello@wuzci.com


Happy designing!